
Have you ever found yourself stranded on the side of the road, your 2010 Dodge Caliber refusing to cooperate, while a nagging suspicion lingers – is it a blown fuse? Fear not, fellow Caliber owners, because we’re about to embark on a journey into the depths of your vehicle’s electrical system, unraveling the mysteries of the 2010 Dodge Caliber fuse box diagram. This guide will empower you with the knowledge and confidence to troubleshoot any electrical glitches that might arise, ensuring you can get back on the road quickly and safely.

Image: fixkaiser99.z13.web.core.windows.net
Imagine the relief of understanding your Caliber’s electrical system, becoming a master of your own automotive destiny. Whether you’re a seasoned mechanic or a novice driver, this article is your key to unlocking the secrets of your car’s electrical heart. We’ll explore the fuse box locations, decipher the layout, and equip you with the tools and expertise to navigate the intricate world of fuses and relays.
Understanding the 2010 Dodge Caliber Fuse Box: Your Car’s Electrical Command Center
The fuse box within your 2010 Dodge Caliber serves as the electrical command center, safeguarding the intricate wiring network that powers every feature, from headlights to radio, from power windows to your engine’s spark. It’s a vital component, and understanding its inner workings can save you time and money in the long run.
Primary Fuse Box Location:
The main fuse box in your 2010 Caliber resides within the passenger compartment, positioned beneath the dashboard on the driver’s side. It’s often easily accessible by opening the glove box and looking beneath it. This fuse box houses a multitude of fuses, each dedicated to a specific electrical circuit in your car.
Auxiliary Fuse Box Location:
A secondary fuse box, often called the “power distribution center,” is located in the engine compartment, typically situated near the battery. This box primarily handles fuses and relays related to power systems and engine functions.
Decoding the Fuse Box Diagram: Navigating Your Car’s Electrical Map
The fuse box diagram, often included in your owner’s manual or readily available online, is your personal roadmap to understanding your Caliber’s electrical system. It visually showcases the fuse arrangement, labeling each fuse with its amperage rating and the specific circuit it safeguards.
Reading the Fuse Diagram:
The diagram is your key to identifying which fuse controls a particular electrical component. It’s organized in a row and column format, with each fuse represented by a small square. Every square will contain a number, corresponding to the fuse’s position within the box. Additionally, you’ll find a descriptive legend indicating the function of each fuse, linking the fuse number to the component it protects.
The Fundamentals of Fuse Amperage:
Each fuse within the diagram has an amperage rating, representing the maximum electrical current it can safely handle. This rating is crucial for safeguarding the electrical circuit and preventing overheating or potential damage. Should the current exceed the fuse’s rating, it will predictably break, interrupting the flow of electricity and protecting the connected components.
Inspecting and Replacing Fuses: Basic Electrical Troubleshooting
Finding a blown fuse is one of the simplest electrical issues you can troubleshoot on your own. Here’s a step-by-step guide to inspecting and replacing fuses:
1. Locate the Relevant Fuse:
Using the fuse box diagram, pinpoint the fuse corresponding to the malfunctioning component. Note its number and amperage rating.
2. Visually Inspect the Fuse:
Carefully remove the suspect fuse from its slot. Look for signs of damage, such as a broken wire, a melted or blackened interior, or simply a complete rupture. This indicates that the fuse has blown and needs replacement.
3. Replace the Blown Fuse:
Ensure you use a new fuse with the same amperage rating as the original. Avoid using a fuse with a higher amperage rating, as it could lead to overheating or potential damage to the electrical system.
4. Test the Circuit:
After replacing the fuse, re-engage the affected component (headlights, power windows, etc.) to see if it now functions properly. If the issue persists, there may be a more significant electrical problem, and you might need to seek professional assistance.
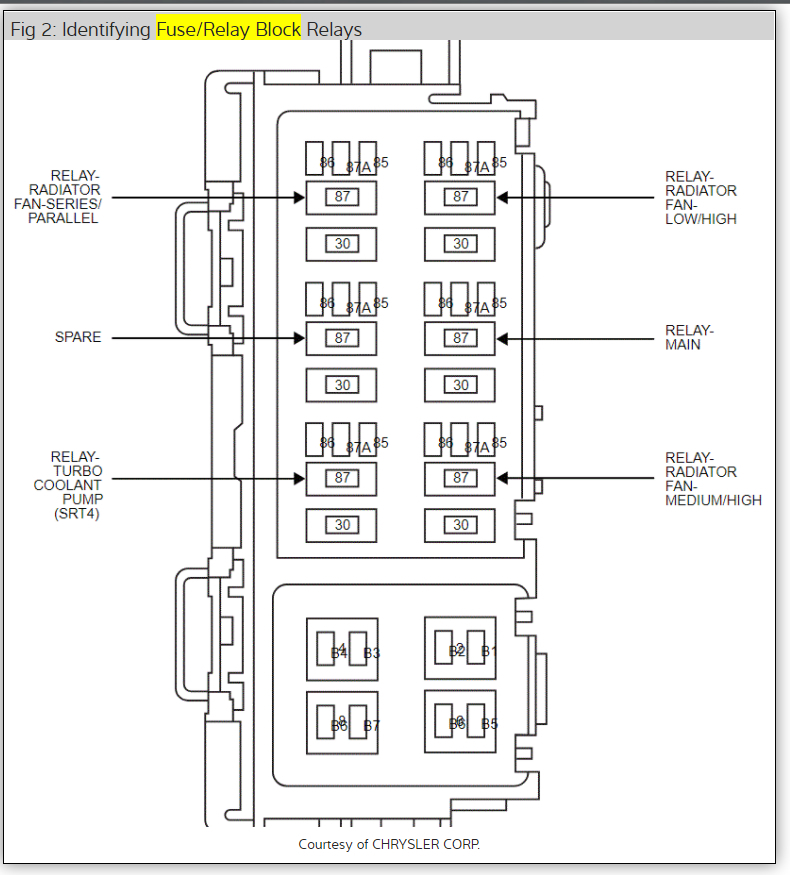
Image: www.2carpros.com
Understanding Relay Functionality: The Electrical Switches
Relays are often found alongside fuses in your vehicle’s electrical system. They function as electrical switches, relaying a signal from one circuit to another. In simpler terms, they amplify a low-current signal to activate a higher-current circuit, enabling components to perform their desired function.
Types of Relays:
Various relays control different functions within your car. Some common examples include:
- Ignition Relay: Controls the ignition system, allowing the engine to start.
- Fuel Pump Relay: Activates the fuel pump, ensuring the delivery of fuel to the engine.
- Starter Relay: Enables the starter motor to crank the engine.
- Headlight Relay: Controls the headlights, ensuring they turn on and off as desired.
Relay Troubleshooting:
A malfunctioning relay can cause issues similar to those caused by a blown fuse. You can diagnose relay problems through visual inspection for signs of damage, corrosion, or overheating.
If a relay is suspected, you can test it by using a multimeter to measure continuity across the relay’s contacts. If the relay fails this test, it needs replacement.
Safety First: Navigating Electrical Systems with Caution
While the steps above seem straightforward, it’s vital to remember that working with any electrical system requires a degree of caution:
- Always disconnect the battery: Before working with fuses or electrical components, disconnect the negative terminal of the battery to prevent accidental electric shock.
- Avoid contact with metal components: Always use insulated tools and avoid touching any metal components within the fuse box or engine compartment.
- Seek professional help if unsure: If you’re not comfortable working with electrical components or feel unsure about any aspect of this process, it’s always best to seek assistance from a qualified mechanic.
2010 Dodge Caliber Fuse Box Diagram
Empowering Your Electrical Literacy: Your Journey Begins Here
Decoding the 2010 Dodge Caliber fuse box diagram is a valuable skill that allows you to diagnose and troubleshoot common electrical issues confidently. Remember, the fuse box diagram is your key to understanding your car’s electrical system. With a bit of practice, you’ll be able to identify a blown fuse, replace it, and get back on the road with ease. So, embrace your newfound electrical literacy, and enjoy the peace of mind knowing you can handle those pesky electrical quirks.
Should you encounter any complex electrical issues or find yourself stumped by a particular diagnosis, don’t hesitate to contact a trusted mechanic for their expert assistance. With this newfound knowledge and a bit of dedication, you’ll be well equipped to navigate the electrical landscape of your 2010 Dodge Caliber, securing your ownership experience and confidently conquering those unexpected electrical hiccups.


