
Ever had your power windows mysteriously stop working mid-drive? Or maybe your headlights abruptly dimmed, leaving you stranded in the twilight? A blown fuse can be the culprit, but knowing where to look can be tricky. This article delves into the heart of your 1999 Jeep Grand Cherokee, exploring the interior fuse panel and its intricate network of electrical protection.

Image: psoriasisguru.com
The fuse box plays a critical role in safeguarding your vehicle’s electrical system. It acts as a circuit breaker, interrupting the flow of electricity before a short circuit or overload leads to a dangerous meltdown. Understanding where each fuse is located and what it controls can be a game-changer when dealing with sudden electrical malfunctions. It’s like having a mini-diagnostics tool right at your fingertips. By mastering the art of the fuse box, you can save yourself time, frustration, and potentially expensive repair bills.
Navigating the Maze: Locating Your Interior Fuse Box
The interior fuse box in your 1999 Jeep Grand Cherokee sits conveniently near the driver’s side knee, typically beneath the dashboard. To access this electrical heart of your vehicle, you’ll need to locate a panel about the size of a small toolbox. It’s usually covered by a plastic lid, which you can easily remove using a screwdriver or a small pry tool. Once the lid is off, you will be greeted by rows of fuses, neatly organized in a labeled diagram. Think of it as a mini-electrical map, guiding you to the source of your electrical woes.
Decoding the Fuse Diagram: Unlocking the Secrets of Electrical Protection
The fuse diagram is your key to understanding which fuse controls what. Each illustration in your Jeep’s interior fuse box is a visual representation of your car’s electrical network, detailing each circuit and its accompanying fuse. It’s like a mini-anatomy lesson, breaking down the electrical functions within your vehicle. For example, you might find fuse numbers for the power windows, headlights, radio, or even the lighter. This map is your lifeline to solving electrical problems, allowing you to pinpoint the guilty fuse and replace it with a new one. It’s a surprisingly empowering feeling to be equipped with the knowledge to understand the inner workings of your Jeep and make quick fixes yourself.
Common Fuses and Their Roles: Powering Your Jeep’s Perks
Inside your 1999 Jeep Grand Cherokee’s fuse box, you will find several essential fuses that keep your daily drives running smoothly. Here’s a quick overview of some common fuses and their responsibilities:
- Headlights: Ensures your visibility at night, navigating through darkness with ease.
- Taillights: Keeps you visible to other drivers, especially crucial during nighttime commutes.
- Power Windows: Allows effortless control of your windows, adding comfort and convenience.
- Radio: Provides entertainment for your journeys, keeping you connected to music and information.
- Cigarette Lighter: Offers a power source for charging your devices or plugging in a small electric appliance.
- Horn: Makes sure your voice can be heard in emergencies, whether it’s honking at a distracted driver or warning others of a potential hazard.
- Wipers: Keeps your windshield clean and clear, ensuring optimal visibility during inclement weather.
It’s crucial to note that fuse numbers and the fuse layout can vary slightly between Jeep Grand Cherokee trim levels or model years. If you’re unsure about a specific fuse, always consult your vehicle’s owner’s manual or a reliable online resource like a Jeep service manual. Don’t rely on assumptions or guesswork when dealing with your vehicle’s electrical system.
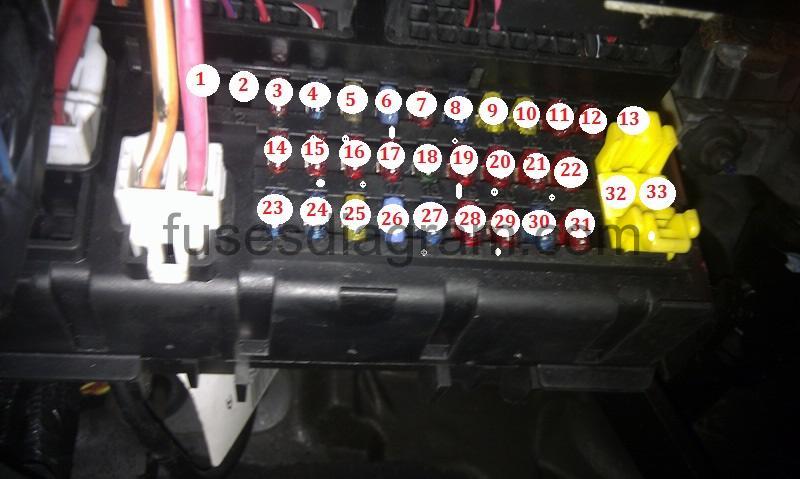
Image: mechanicyurem101.z19.web.core.windows.net
Replacing a Blown Fuse: A Simple Fix for Electrical Problems
If you’re confident in replacing a fuse, here’s a breakdown of the steps:
- Locate the Blown Fuse: Identify the fuse in question using your fuse diagram. Look for a fuse that is melted, broken, or discolored — these are telltale signs of a blown fuse.
- Pull Out the Blown Fuse: Use a pair of fuse pullers or tweezers to gently remove the blown fuse from its socket. Be careful not to touch the metal contacts.
- Insert a New Fuse: Replace the blown fuse with one of the same amperage. Using a fuse with a higher amperage can create a fire hazard, so it’s crucial to stick to the recommended rating.
- Test the Circuit: After installing the new fuse, test the circuit to see if it’s working properly. If the fuse blows again, it suggests a deeper electrical issue that may require professional attention.
Always remember that working on your vehicle’s electrical system carries a degree of risk. If you’re uncomfortable handling electrical components, it’s best to seek professional help from a qualified mechanic. They can diagnose electrical problems, fix any faulty wiring, and ensure that your vehicle’s electrical system is safe and reliable.
Troubleshooting and Beyond: Keeping Your Jeep Running Smoothly
If you’re experiencing recurring blown fuses, it’s a sign that something deeper might be wrong. There could be a short circuit, a faulty wire, or a component drawing too much power. In such cases, it’s crucial to investigate further to prevent further damage to your vehicle’s electrical system.
Here are some steps to troubleshoot recurring blown fuses:
- Inspect for Faulty Wiring: Look for any frayed, broken, or damaged wires around the circuit that the blown fuse controls. If you find any faulty wiring, it needs to be repaired or replaced.
- Check for Short Circuits: A short circuit occurs when electricity takes an unexpected path, usually due to a faulty wire touching metal. Carefully inspect the wiring and look for any signs of a short circuit.
- Ensure Proper Component Function: If you’ve ruled out faulty wiring and short circuits, the issue might be a component that’s drawing too much power. Check the component related to the blown fuse and make sure it’s operating correctly.
If you’ve taken the necessary troubleshooting steps but still can’t pinpoint the problem, it’s best to consult a professional mechanic. They have the expertise and tools to diagnose complex electrical issues and ensure your Jeep’s electrical system is back to its peak performance.
Interior Fuse Panel 1999 Jeep Grand Cherokee Fuse Box Diagram
Conclusion: Empowering Yourself with Fuse Box Knowledge
Mastering the intricacies of your 1999 Jeep Grand Cherokee’s interior fuse panel is like gaining a superpower. By understanding the fuse diagram and recognizing the symptoms of a blown fuse, you can quickly troubleshoot electrical issues and avoid unnecessary trips to the mechanic. This newfound knowledge empowers you to take control of your vehicle’s electrical system and keep it running smoothly for years to come.
Remember: a little preventative maintenance goes a long way. Always check your fuses periodically for signs of wear or damage. By staying proactive and vigilant, you can prevent potential problems and ensure your Jeep is ready for any adventure you throw its way. So next time your headlights flicker, your power windows stop working, or any other electrical nuisance arises, dive into your fuse panel, armed with this guide, and confidently restore your Jeep to its full glory.


